Preparing Slip Reports
From the Home Screen use: 4. Forms and Data > View and print reports
From the Menu use: Forms > Reports Centre
Refer to The Reports Centre for details on selecting the return type and form to process.
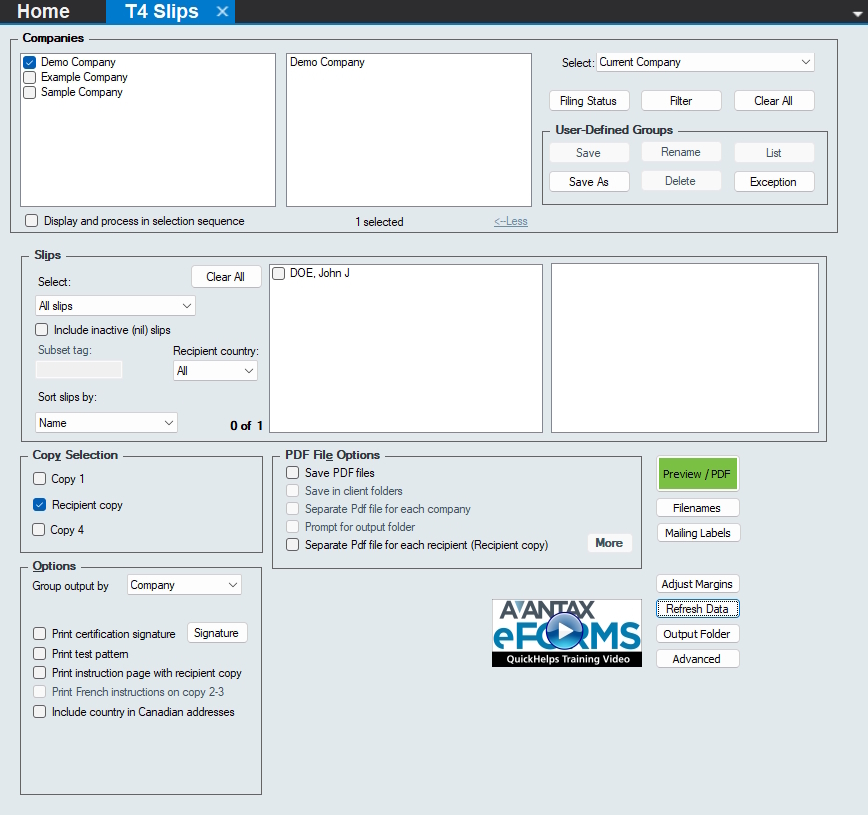
Reports Dialog - T4 Slip
Use the Company Selection dialog to select the companies for which to prepare reports.
NOTE: When printing T4 & Relevé 1 slips, eForms will report the unadjusted values for any adjusted slips unless all slips for a given company have been adjusted; a warning will be shown if some slips are adjusted and others are not.
Slip Selection
Select - When only one company is selected, the slips that match the selection you have made will be displayed; this box will be empty if multiple companies are selected
- All Slips - Include all the slips for the selected companies
- Original Slips Only - Include only the slips with a slip status of “Original” for the selected companies
- Amended Slips Only - Include only the slips with a slip status of “Amended” for the selected companies
- Cancelled Slips Only - Include only the slips with a slip status of “Cancelled” for the selected companies
- Selected Slips - Include only the selected slips for one selected company
- Has email consent - Include only the slips that do not have the email consent checkbox checked in the slip’s Advanced tab (eForms Enterprise only)
- No email consent - Include only the slips that do not have the email consent checkbox checked in the Advanced tab (eForms Enterprise only)
- Subset tag - Include only slips with the entered subset tag; refer to Submit a Data Subset for details on how to use the subset tag to include a subset of the the total dataset (eForms Enterprise only)
Subset tag - Enter the subset tag to use when selecting slips by subset tag
Recipent country - Select the country from the drop-down list to include slips for that country only
Include inactive (nil) slips - Check this box to include slips which have no dollar values entered
Sort slips by - From the drop-down, select the order in which you wish to sort the slips in the report; the options will change, depending on the return type selected, but typically include: Name, SIN & Data Entry Sequence
Copy Selection
The copies presented here may vary depending on the return type selected
Copy 1 - If you’re preparing a return with fewer than 5 slips, use this option to print the slips for submission to CRA and Revenu Québec
Copy 2 - Whether you are distributing slips by mail or by email, use this option to prepare the slips for distribution to their recipients
Copy 4 - This option will print multiple slips on one page and is used to prepare a file copy for your records
Options
The options presented here may vary depending on the return selected
Group output by - Choose to group the slips by copy number or by company
Print test pattern - Check this box if you wish to test alignment settings for the selected form
French instructions on copy 2-3 - Check this box to print recipient filing instructions in French, available only when printing three slips per page
Include country in Canadian addresses - Enables printing “CAN” as part of the address for jurisdictions where this is the required address format, it is not used within Canada
Suppress calculation of totals (summary only) - Prevents eForms from calculating slip totals to the summary when producing a summary
PDF File Options
Save PDF files - All eForms reports are temporary PDF files, which are deleted when the Print window is closed; selecting this option tells eForms to save the file
This is a system wide setting which used by all users for all reports. For eForms Standard and eForms Enterprise, only the ADMIN user can change this option
Save in client folders - If selected, PDF files will be saved in company folders set in Company Setup, otherwise, you will be asked to provide a location
This option is only available when the Group output by option has been set to Company
Separate PDFs for each company - Select to create a separate PDF file for each company selected
This option will be selected automatically if Save in Client folders has been selected
Prompt for each client folder - Select to have eForms prompt you for the folder in which to save the PDF report for each company
Separate PDF file for each recipient (Recipient copy) (eForms Enterprise only) - When E-Mailing Recipient Slips you can use this option to create a separate PDF file for each recipient
Separate PDF File for Each Recipient
Separate PDF file for each recipient is an advanced feature available only in eForms Enterprise
QuickHelps Video - Create Individual Recipient Slips
eForms Enterprise enables you to create a separate PDF slip for each recipient; which can be protected by password and emailed, if desired. Click on the More button beside “Separate PDF file for each recipient (Recipient copy)” to display the Recipient PDF Options dialog which lets you to configure PDF file names and passwords.
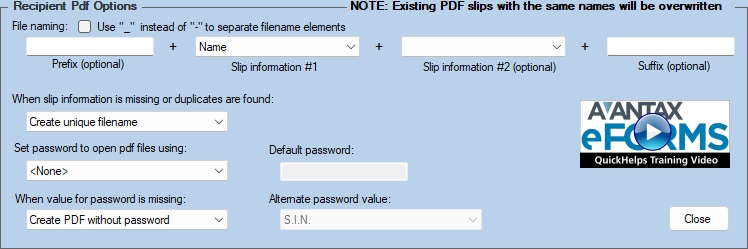
Create Individual Recipient Slips
File Naming - Specifies the format of the filename when creating individual recipient PDF slips
- Prefix (optional) - Data entered here will be used as the first part of the filename and will be used for all PDFs
- Slip information #1 (required) / Slip information #2 (optional) - Lists of available data items, unique to the recipient, to use in the filename; available data items will vary according to the slips being prepared
A special data item, Custom Field, exists for each slip type and can be used to assign a GUID to the PDF file to associate it with a specific recipient to enable slip retrieval from a corporate portal. This field can be imported or entered on the Advanced Tab of the slip’s data entry screen. - Suffix (optional) - Data entered here will be used as the last part of the filename and will be used for all PDFs
- Use ”_” instead of ”-” to separate file name elements - eForms separates file name elements with a hyphen character, check this box to use an underscore character instead.
When slip information is missing or duplicates are found - Tell eForms what action to take if the fields chosen in File naming are empty or if multiple slips are present for the same individual.
- Stop processing - eForms will stop processing data at the first occurrence of missing data or an additional slip for the same individual
- Create unique filename - eForms will append a sequential number to the end of each filename, beginning at “0002”; the first PDF created for the recipient will not be affected.
Set password to open PDF files - Specifies the password to use when creating individual recipient PDF slips.
- <None> - eForms will not assign passwords, and passwords will not be needed to open the PDF files
- List of available data items - Data items unique to the recipient will be used to protect the PDF file; available data items will vary according to the slips being prepared.
- Custom Password - A unique password for each slip, this field can be imported or entered on the Advanced Tab of the slip data entry screen
When value for password is missing - Tell eForms what action to take if the field chosen in Set password to open PDF files is empty.
- Stop processing - eForms will stop processing data at the first occurrence of missing data
- Create PDF without password - eForms will not assign a password to the PDF if the value chosen is empty
- Use default password - eForms will use the data in Default password (on this screen) as the password whenever the value chosen is empty
- Each PDF missing the specified password will have the same default password
- Use alternate password value - eForms will use the data in Alternate password value (on this screen, see below) as the password whenever the value chosen is empty
- Alternate password value - Lists data items unique to the recipient that may be used to protect the PDF file; available data items will vary according to the slips being prepared.
Buttons
Preview / PDF - Click this button to create the report, the report will open in your defaul PDF viewer, from which you can print or save it as desired
Filenames - Setup default filename patterns for eForms reports; three defauls patterns are provided, and you can also createa pattern to suit your needs
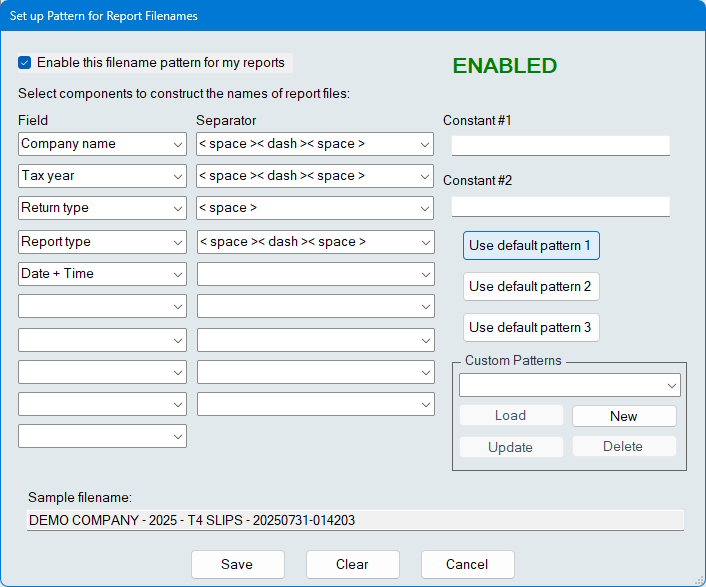
Report Filenames Using Default Pattern 1
- PDF File Naming is disabled by default, click on the Filenames button and check Enable this filename pattern for my reports to enable it. Choose one of the three default patterns, or create a custom report name by selecting any combination of available fields from the drop-down lists, and separator characters from the separator drop-down. The filename pattern is displayed as a pattern or fields & separator characters are selected.
- Information entered in the Constant #1 and Constant #2 fields can be included in the filename pattern by selecting the Constant fields from the fields drop-down.
- Points to keep in mind while using the PDF File Naming System
- Patterns are defined by report type, the pattern used to prepare T4 slips will also be used to prepare NR4 slips
- Slip status is not included in the report if the status is “Original” since these make up the majority of reports
- All four report types have certain fields in common, such as Company Name and Tax Year, some fields are not available for the Company Summary Report (return type and return status) and the Edit List (return status)
- Select a default pattern with a “Use default pattern” button; not all defaults are available for the Edit List and the Company Summary Report
- Patterns are defined by report type, the pattern used to prepare T4 slips will also be used to prepare NR4 slips
Mailing Labels - Prepare mailing labels for the selected slips
Adjust Margins - Adjust the position of the report on the page by entering horizontal and/or vertical offsets
Refresh Data - Incorporates any additions, deletions or changes made to the company list or to the slips since the dialog was opened
Output Folder - Opens Windows File Manager to the folder where eForms writes its reports
Advanced - Use this button to set advanced report settings, available settings are:
- Do not combine and display PDF … - The default PDF viewer will not automatically display files with more than the number of pages entered here
- Batch size … - Print jobs will be divided into batches, each containing the number of pages entered here; a single PDF will be displayed once processing is complete and the individual batch files will be saved to the current PDF Output folder