Preparing XML Reports
Canada Revenue Agency
From the Home Screen use: 5. Filing and Emailing > Electronic (XML) filing > CRA filing
From the Menu use: Electronic Filing > Canada Revenue Agency
QuickHelps Video - How to Prepare & Submit an XML File to CRA
Revenu Québec
From the Home Screen use: 5. Filing and Emailing > Electronic (XML) filing > Revenu QC filing
From the Menu use: Electronic Filing > Revenu Québec
QuickHelps Video - How to Prepare & Submit an XML File to Revenu Québec
Canada Revenue Agency and Revenu Québec employ slightly different XML filing processes, the guide below describes the process for a typical CRA XML submission; details will be included where the processes differ.
Before You Begin
- Electronic filing submissions MUST be made by Internet
- Returns with over 5 slips MUST be filed electronically
- XML files MUST NOT exceed 150Mb in size
- Paper copies MUST NOT be submitted for returns filed electronically
- Revenu Québec XML files MUST be created before creating recipient slips
XML File Preparation
Step 1: Select Companies
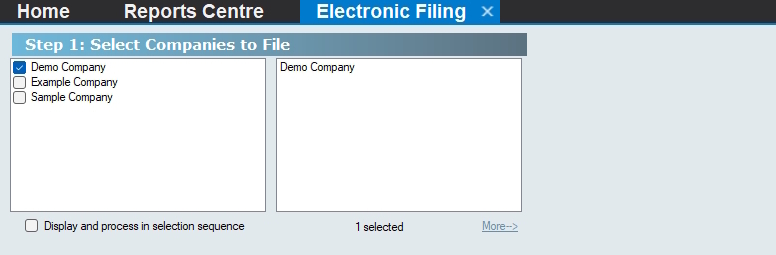
Electronic Filing - Select Companies
Use the Company Selection dialog to select the companies to include in the XML submission.
Step 2: Select Type of Return
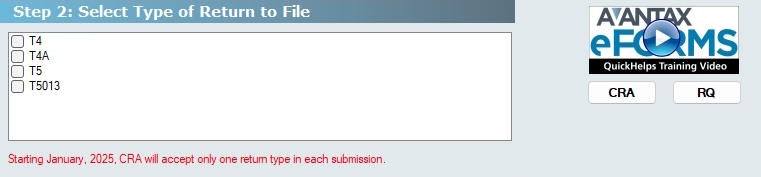
Electronic Filing - Select Return Type
Select the return type to include in the XML submission. NOTE: As of January 2025, CRA no longer accepts XML submissions containing multiple return types, both CRA and Revenu Québec XML submissions can now only contain data for a single return type.
Step 3: Check Setup Options

Electronic Filing - Check Setup Options
Transmitter Setup - Click this button to open the Electronic Filing tab of the User Settings dialog, where you can add or edit transmitter information as required.
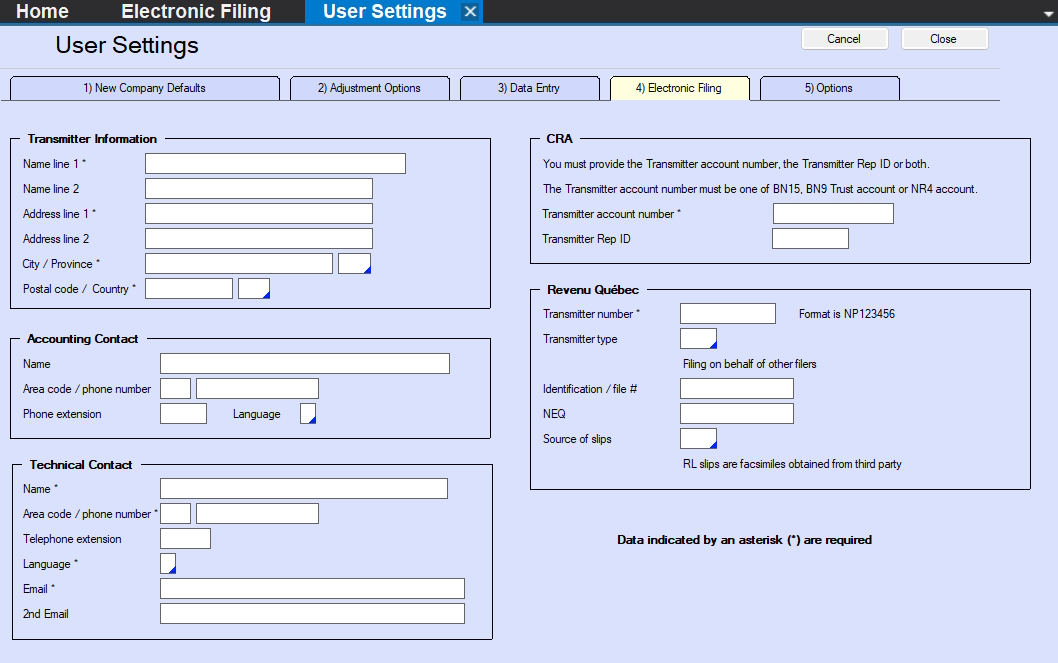
User Settings - Electronic Filing
NOTE: Items marked with an astersik are required.
Transmitter Information section - This section contains the contact information of the Transmitter of the XML submission, NOT the company to which this data belongs.
Accounting Contact section - This section contains the contact information for the accounting contact for the data being submitted; CRA or Revenu Québed may contact this individual if the XML file has accounting issues..
Technical Contact section - This section contains the contact information for the technical contact for the data being submitted; CRA or Revenu Québed may contact this individual if the XML file has technical issues.
CRA section - This section contains the transmitter account information for the Transmitter of the XML submission, NOT the company to which this data belongs.
- Enter EITHER the Transmitter Number OR the Rep ID OR BOTH.
- The number used to access the CRA filing portal MUST be the same as the number entered on this screen.
- The transmitter account number can be either: a 15 character Business Number; a 9 character Business Number; a Trust Account Number; or an NR4 Account Number.
Revenu Québec section - This section contains the transmitter account information for the Transmitter of the XML submission, NOT the company to which this data belongs.
- Transmitter Number - Enter the 8 character number assigned to the Transmitter by Revenu Québec
- Transmitter Type - Select the appropriate Transmitter type from the drop-down list.
- Identification / file # - The 16 character Business Number assigned to the Transmitter by Revenu Québec.
- NEQ - The 10 digit numerical identifier assigned to the Transmitter.
- Source of slips - Select the source of slips from the drop-down list.
Set Output Folder - Click this button to change the location where eForms will save the XML output for this report.
Revenu Québec Sequence Numbers
Refer to Revenu Québec Sequence Numbers for details on using the sequence numbers issued by Revenu Québec.
Set Relevé Number - Click this button to set the eight digit electronic sequence number from which eForms will begin assigning sequence numbers to the slips in a Revenu Québec XML file; if no starting sequence number has been set, eForms will request a sequence number when it creates the Revenu Québec XML file
Remove Relevé Numbers - Click this button to remove ALL electronic sequence numbers from all slips of the selected type; this change is irreversible and we recommend making a backup before selecting this option
Step 4: Setup Filing Options
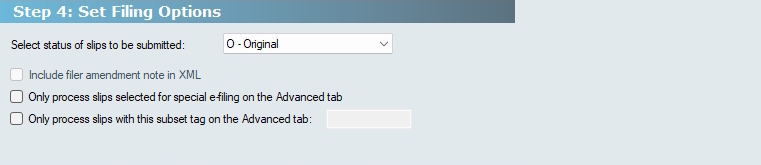
Electronic Filing - Setup Filing Options
Select Status of Slips to be Submitted - Select “Original,” “Amended” or “Cancelled” to include all slips of the status selected for all companies included in your submission. NOTE: Each submission must contain only original, amended or cancelled returns. NOTE: eForms does not include slips having a zero dollar value in an electronic submission.
Include amendement note in XML - Available only if preparing an amended return and is used to include a note describing the reason for the amendement in the XML file.
Only process slips selected for special e-filing on the Advanced tab - Check to include only slips that have this box checked on the Advanced tab of their data entry screen, allowing selection of a subset of slips for XML submission; such as when making a second or third additional, amended or cancelled submission.
Only process slips with this subset tag on the Advanced tab (eForms Enterprise only) - Check to include only slips that have a particular subset tag entered on the Advanced tab of their data entry screen, allowing selection of a subset of slips for XML submission; such as when making a submission for another department.
Step 5: Prepare & Validate Submission File

Electronic Filing - Prepare & Validate Submission File
XML File and Validation Report - Validates data for the selected return type against the CRA or Revenu Québec XML specifications, displaying a validation report that includes the option of creating the XML file for submission.
Validation Report Only - Validates data for the selected return type against the CRA or Revenu Québec XML specifications, displaying a validation report that DOES NOT includes the option of creating the XML file for submission.
Refresh - Incorporates any additions, deletions or changes made to the data since the dialog was opened

Electronic Filing - Error Report
In the event that validation errors are found, the validation report will be displayed.
Critical Errors - Critical errors are errors which MUST be resolved before an XML file can be created
Warnings - Warnings are errors which WILL NOT prevent the creation of an XML file if ignored; we recommend resolving as many as possible to reduce the risk of the XML submission being rejected
Print - Prints the current validation report
In addition to the above, any Critical or Warning error that is presented in red text MUST be resolved before an XML file can be created. Most errors will include a link to display the error for resolution.
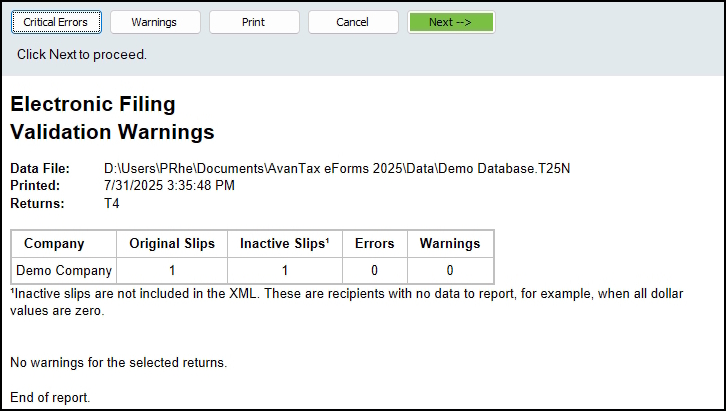
Electronic Filing - Validation Report
Once all necessary data corrections have been made and the XML File and Validation Report button has been clicked, the validation report will be displayed, and will now include a green Next —> button, click this button to create the XML file.
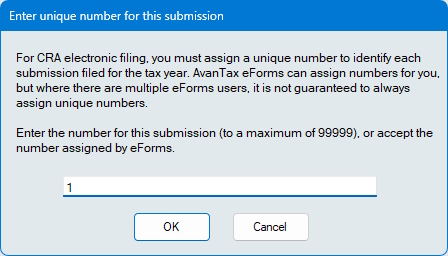
Electronic Filing - CRA File Number
Both CRA and Revenu Québec require that each XML submission file be identified by a unique numeric identifier appended to file name. eForms updates this number as required, but in multi-user environments you may need to manually enter the next available identification number in the dialog above.
XML File Submission
Step 6: Your XML Submission
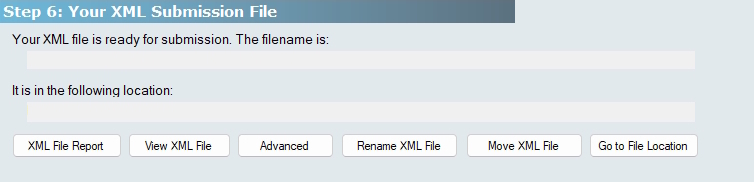
Electronic Filing - Your XML Submission
The name of the XML file, and its location on your system, are displayed here, you will need to use this information when submitting the XML file to CRA or Revenu Québec.
XML File Report - Displays a report describing the data included in the XML file.
View XML File - Opens the XML file in your default XLM viewer, this is useful if you wish to verify the data in the XML file
Advanced - Displays these additional buttons:
- Rename XML File - Change the name (if necessary) of the XML file prior to submission, so that eForms can enter the correct name in its logs
- Move XML File - Move the XML file to another location
- Go to File Location - Opens Windows File Explore to the XML file’s location
Step 7: Submit Your File

Electronic Filing - Submit Your File
The XML file has been created but the submission is NOT automatic as neither CRA nor Revenu Québec permit third-party software access to their filing portals, and require that each XML file be submitted independently. Clicking the Go to the Internet filing web page button will open your default Internet browser to the CRA or Revenu Québec filing portal, through which you will be able to upload your XML file. You can also use the links below if the security policies in place in your location prevent software such as eForms from opening external websites:
The How to submit your XML file button, to the right, links to a guide on how to submit XML files.
CRA Submissions for Years Prior to 2024
NOTE: As of January 2025, CRA requires that _ALL XML submissions for years prior to 2024 MUST be in the XML format introduced in the 2024 tax season. Specifically, the transmitter information (or T619 record) MUST be in the new format introduced for 2024; this applies to ALL XML submissions for ALL years prior to 2024, regardless of if they are Additional, Amended or Cancelled submissions.
We have created a FREE utility that can update the T619 record of ANY XML file created by ANY application for ANY year prior to 2024 to the standard introduced by CRA for 2024.
Click here to download the FREE tool, there is no obligation and no installation is required.
Step 8: Record the Submission in Your Data File
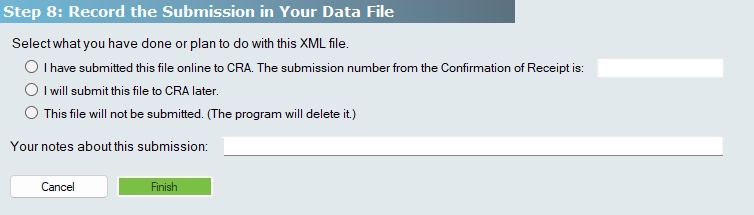
Electronic Filing - Record the Submission
Click one of the readio buttons to indicate how the XML submission process will end:
I have submitted this file online - Once the XML file has been successfully submitted to CRA or Revenu Québec, a confirmation page will be displayed which will include a submission number. Enter this number into the field beside The submission number from teh Confirmation of receipt is:
I will submit this file to CRA later - This will terminiate the XML submission process, but will save the XML file in the XML output folder for submission at a later date; be sure to save all submission information provided by CRA or Revenu Québec in your records when you submit the XML file.
This file will not be submitted - This will terminate the XML submission process AND will delete the XML file from your system
Finish - Commits the selection above to eForms
What’s Next

Electronic Filing - What’s Next
Now that you’ve created your XML file to submit to CRA or Revenu Québec, it’s time to consider how you’ll distribute the recipient slips. Just in case you have more slips than you want to distribute yourself, the What’s Next section includes a link to our AvanTax Filing Services website where you can find out if having AvanTax distribute your slips for you might be a viable alternative.