Starting AvanTax eForms for the First Time
QuickHelps Video - Starting eForms for the First Time
Starting eForms
Once eForms has been installed, a program group named ”2025 AvanTax eForms” will be added to your system’s Start Menu. This program group will contain links to AvanTax eForms and its documentation: Additionally, an eForms icon, like the one below, will be created on your system’s desktop.
![]()
Double-click the eForms icon to start AvanTax eForms and display the Home Screen.
If you’re using eForms Standard or eForms Enterprise, eForms will display the login screen where you can enter your user name and password, as well as selecting the language for eForms to use.
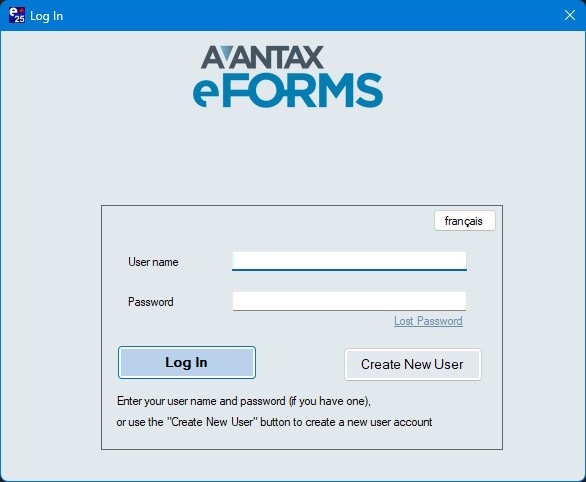
After logging in with eForms Standard or eForms Enterprise, or immediately if you’re using eForms Free, eForms Lite or eForms Basic, eForms will start and display the Home Screen.
Home Screen
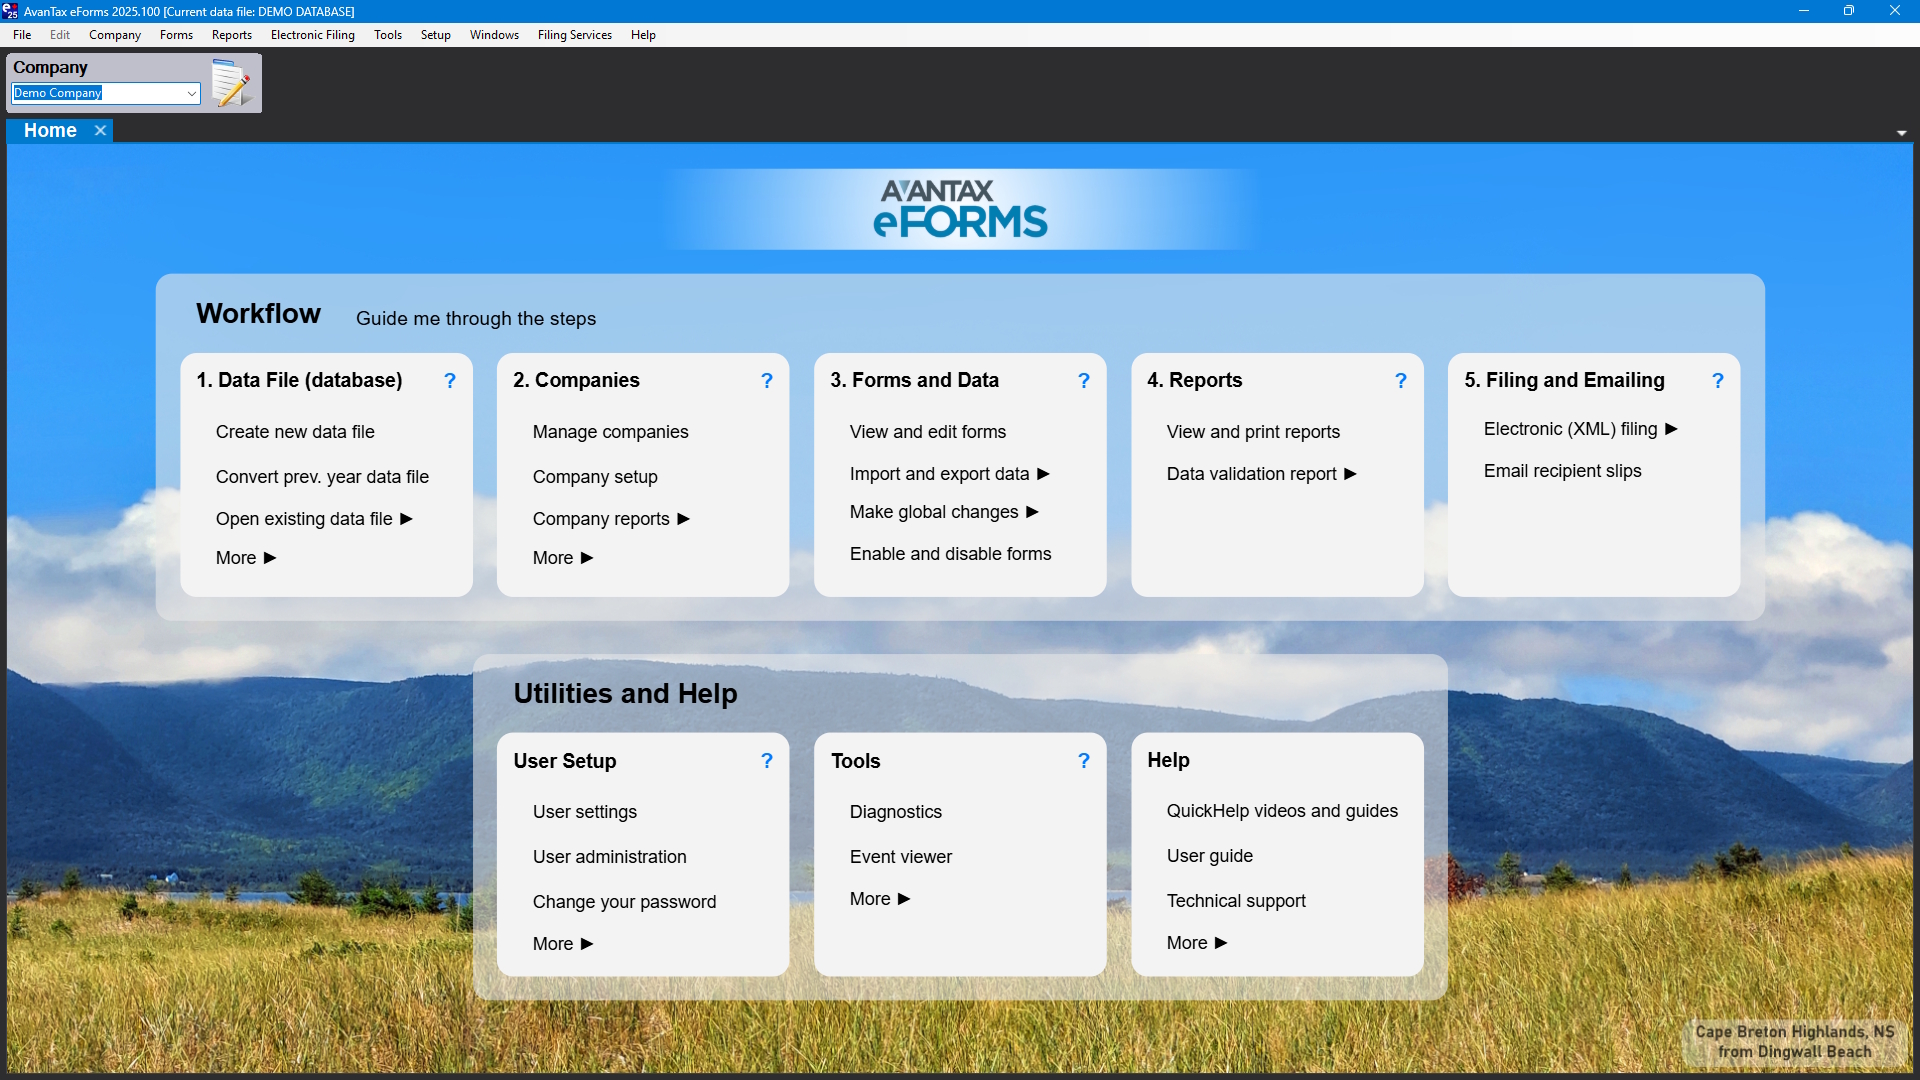
AvanTax eForms Home Screen
Workflow
With this group of items, you can accomplish the majority of tasks required to enter data, preview data and prepare your final reports and submissions. eForms’ major components are arranged here according a typical workflow.
Guide me through the steps opens the Guided Tours panel, containing a variety of Tours which will guide you through anything you might need to do with eForms.
1. Data File (database)
Use this workflow item to manage your data file(s)
- Create new data file - Create a new data file to hold company and employee information
- Convert prev. year data file - Convert a 2024 data file into a new 2025 data file
- Open existing data file - Open a previously created 2025 data file
- More - Access less frequently used data file tools
- Data file security (eForms Standard and eForms Enterprise) - Define users who can or cannot access specific data files
- Current data file information - Displays a pop-up showing the number of companies and slips in the data file
- Copy current data file - Make a copy of the current data file
- Backup current data file - Make a backup of the current data file
- Restore data file - Restore a backup of a data file
- Close data file - Close the current data file
2. Companies
This workflow item becomes available once a data file is open and is used to manage your company data
- Manage companies - Access company managment console, allowing you to:
- Create a new company
- Copy a company within the current data file
- Delete a company from the current data file
- Transfer a company to a new data file
- Merge two companies to a new company in a new data file
- Backup your data file
- Company setup - Create a new company or edit details of the current company
- Company reports - Access to various company reports:
- Company summary - Shows selected information for each company in the current data file
- Company filing status - Shows filing status for each company in the current data file
- Company statistics - Statistial summary of the total number of companies and returns
- More - Access less frequently used company reports
- T4 / RL-1 adjustment - Run an ajustment report with the currently active adjustment options
3. Forms and Data
This workflow item becomes available once a company is open and is used to manage your return data
- Vew and edit forms - Opens the Forms Centre, through which you can access slips and summaries for any currently active form
- Import and export data (eForms Standard and eForms Enterprise) - Access data import & export tools
- Import from Excel - Import data from an Excel XLSX file
- Import from CSV - Import data from a CSV file; MS-DOS format
- Open Excel template - Opens the Excel template installed with eForms
- Import CRA data from XML - Import data from a CRA format XML file
- Import Rev QC data from XML - Import data from a Revenu Québec format XML file
- Export to CSV (eForms Enterprise) - Export data from an eForms data file into a CSV file
- Make global changes - Various options to change slip data in bulk
- Edit slip data - Globally change a wide range of slip data for a selection of companies and return types
- Delete slips - Block delete all slips for a selection of return types
- Edit contact information - Globally change contact and certification information appearing on the summaries
- Create slips from another type - Create slips for another return type, containing name & address information on an existing return type
- Enable and disable forms - Opens the Configure Data File tool through which you can add return types to an eForms data file
4. Reports
This workflow item becomes availble once a company is open and is used to create reports
- View and print reports - Opens the Reports Centre, through which you can print slips, summaries and edit lists and process XML files for any currently active form
- Data validation report - Checks selected data against the CRA and Revenu Québec XML schemas and confirm data validity before creating XML files and prepareing recipient slips
5. Filing and Emailing
This workflow item becomes availble when a company is open and is used to create XML submissions and email recipient slips
- Electronic (XML) filing - Access various tools associated with XML filing and reports
- CRA filing - Begins the process to create an XML submission for Canada Revenue Agency
- Revenu QC filing - Begins the process to create an XML submission for Revenu Québec - NOTE: As per Revenu Québec policy, XML submissions MUST be completed BEFORE preparing & distributing recipient slips
- E-Filing history report - Shows XML filing status and submission dates for each company in the current data file
- Edit e-filing history - Add missing information to existing e-filing data
- Email recipient slips (eForms Enterprise) - Opens the email slips dialog, through which you can send password protected slips to their recipients
Utilities and Help
Use this group of items to accomplish various administrative tasks and access a wide variety of support resources.
User Setup
This Utilities and Help item is used manage various user options and preferences
- User settings - Opens the User Settings centre, through which you can manage user preferences
- User administration (eForms Standard and eForms Enterprise) - Opens the User Administration centre, through which you can manage user accounts
- Change your password (eForms Standard and eForms Enterprise) - Change the password for the current user
- More - Access less frequently used user setup functions
- Rates and constants - Displays the default 2025 rates for CPP/QPP, EI, PPIP & etc.
- System folders - Opens the Diagnostics center to display all folders currently used by eForms
- Close data file - Close the current data file
- Switch to classic home page - Replaces the workflow oriented Home Screen with the older Start Page
Tools
This Utilities and Help item contains a variety of tools useful to advanced users and our technical support team
- Diagnostics - Opens the Diagnostics center to display all folders and settings currently in use by eForms
- Event viewer (eForms Enterprise) - Reports major events occurring within eForms by each user
- More - Access less frequently used tools
- Unlock all companies in data file - Unlocks company records in the current data file; such as when an unexpected shutdown has left record locks in place
- Data integrity check and recalculation - Recalculates all summaries for all companines in the current data file
- Repair user database - Attempts to resolve issues in the user settings database
- Edit system settings file - Opens your default INI file editor to edit various system settings
- Edit paths file - Opens your default INI file editor to edit the paths used by eForms
- Edit user settings file - Opens your default INI file editor to edit various settings for the current user
Help
This Utilities and Help item gives you access to our extensive list of technical support resources
- QuickHelp videos and guides - Quick answers to your most common questions
- User guide - Opens your default browser to this user guide
- Technical support - Opens the technical support page on our website, which displays our contact information along with various technical support options
- More - Access less frequently used help resources
- Authorization code and purchase history - Opens our online Shop to display authorization codes for each of your eForms purchases
- Send email to support - Opens your default email client to send a question to our support team
- Send error log - Opens your default email client to send an eForms error report to our support team
- Remote support session - Opens your default browser to our technical support page so that you can initiate a session where our support team can remotely control your system to more thouroughly diagnose a problem
Guided Tours
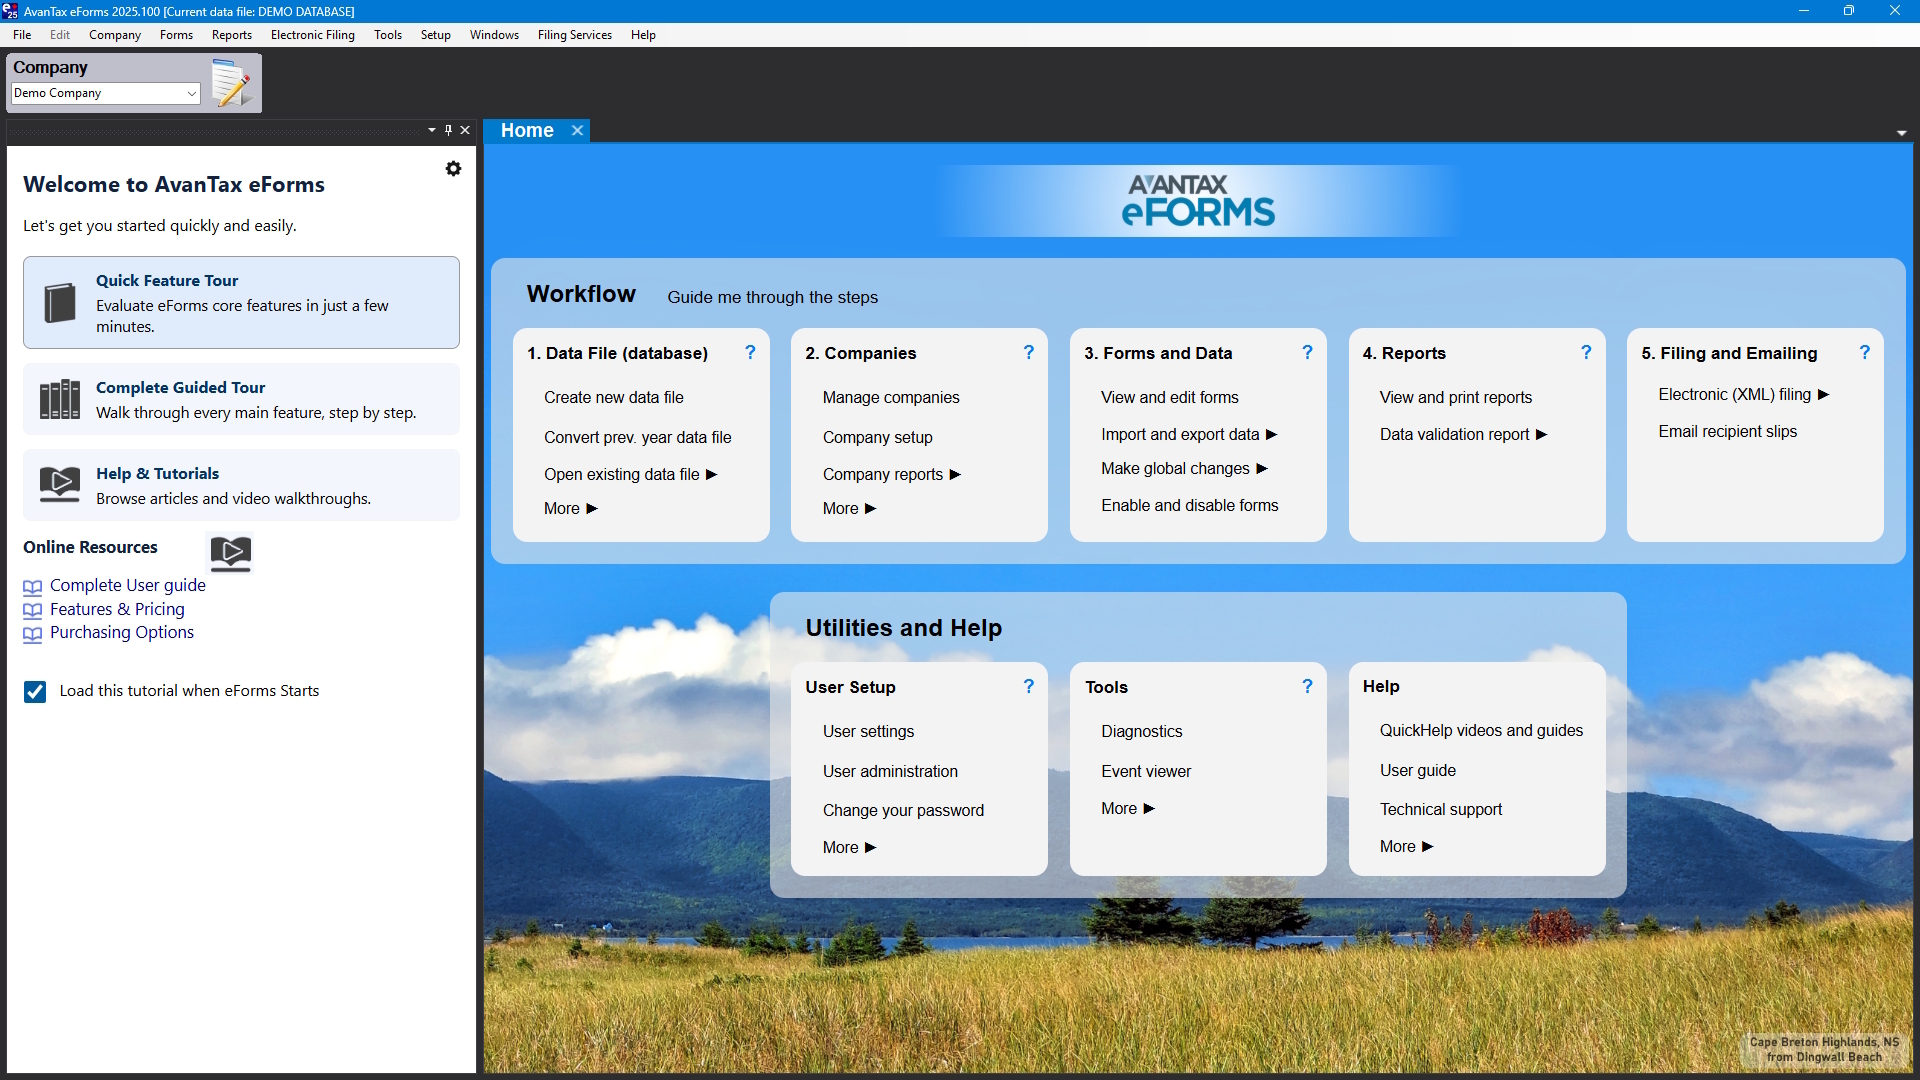
AvanTax eForms Home Screen, with Guided Tour Panel
A exciting new feature that we’ve introduced in eForms 2025 is the Guided Tour, which is displayed on the left of the Home Screen. The Guided Tour is displayed when starting eForms for the first time, and can also be displayed by clicking on Guide me through the steps, to the right of Workflow.
Many of the Guided Tours also include links to online resources available from the eForms website, these will be indicated by the icon below:
![]()
As well, tours may use the buttons below:
- Hovering over the “Show Me” icon highlights the feature being described on the eForms Home Screen
![]()
- Clicking on the “Go” icon will take you directly to the feature being described in the tour
![]()
Quick Feature Tour
This tour guides you through eForms’ major features, providing a brief description of each feature.
Complete Guided Tour
This tour guides you through the process of using eForms to enter & review data, prepare a return and distribute recipient slips. A brief description of each feature is provided.
Help & Tutorials
This tour will take you to the QuickHelps Guides on the eForms website. The QuickHelps Guides are a series of pages and videos which answer many of the questions asked by eForms users.
Online Resources
This tour presents a variety of resources available on the eForms website.
- Complete User Guide - Opens this guide in your default Internet browser
- Features & Pricing - Opens the version comparison page in your default Internet browser
- Purchasing Options - Opens the eForms purchase page in your default Internet browser