Email Recipient Slips
From the Home Screen use: 5. Filing and Emailing > Electronic (XML) filing > Email recipient slips
From the Menu use: Reports > E-mail Recipient Slips
QuickHelps Video - How to Email Password Protected Recipient Slips
Before You Begin
- All slip PDFs MUST already have been created using Separate PDF for Each Recipient
- Per Canadian privacy legislation, explicit recipient consent MUST be obtained before emailing slips
- Although PDF passwords are optional, we STRONGLY recommend that each slip be password protected
Email Slips
Step 1: Select Companies
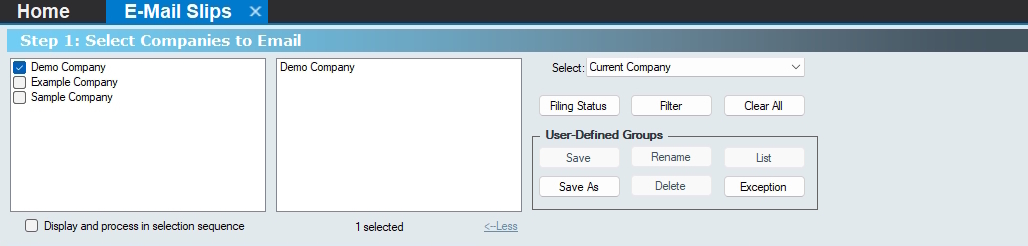
Email Slips - Select Companies
Use the Company Selection dialog to select the companies to include in the XML submission.
Step 2: Select Slips
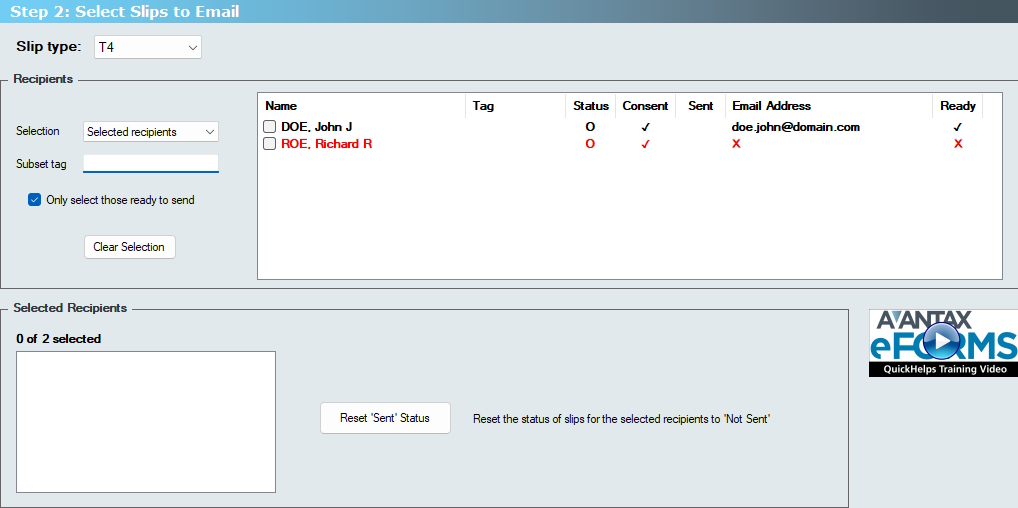
Email Slips - Select Slips
Slip Type
Slip Type - Select the slip type to be emailed
Recipients
Selection - Select the slips to be emailed from the drop-down list; the available options are:
- All - Email will be sent to all recipients
- Unsent - Email will be sent to recipients who have not already been sent an email
- Selected Recipients - Email will be sent to selected recipients only (not available when multiple companies have been selected)
- Original - Email original slips only
- Amended - Email amended slips only
- Cancelled - Email cancelled slips only
Subset Tag - Enter the subset tag to be used to select slips to email
Only select those ready to send - Selects only those slips which are ready to be emailed, based on the criteria below; slips that are ready to be emailed are indicated by a green check mark in the Ready column, above:
- The recipient has given consent to receive thier slip by email
- An Email address has been entered for the recipient
Clear Selection - Clears the current selections
Selected Recipients
# of # Selected - Lists recipients to whom email will be sent, unless multiple companies have been selected in Step 1
Reset “Sent” Status - Resets email sent status to Not Sent for all selected recipients
Step 3: Compose Email
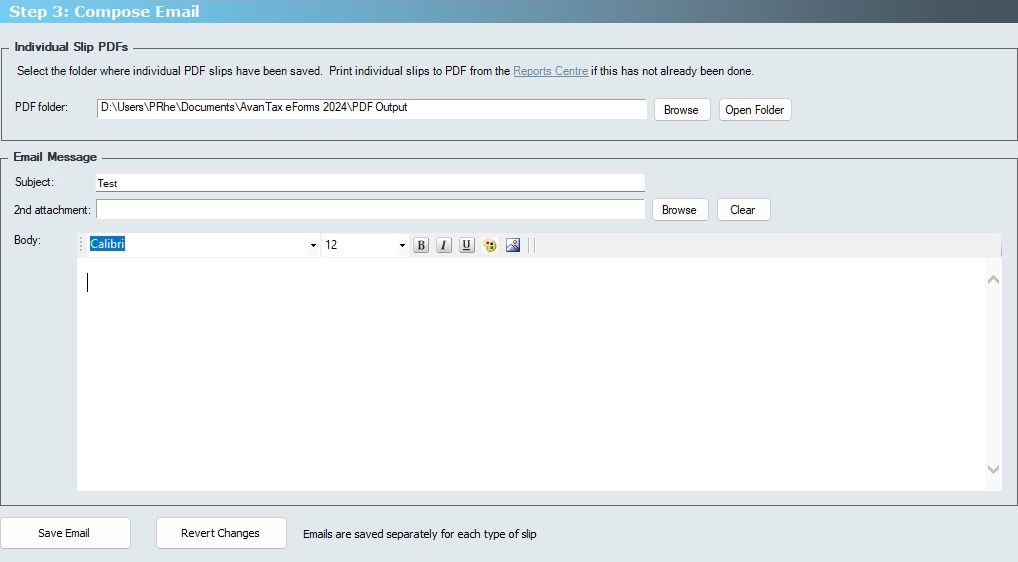
Email Slips - Compose Email
Individual Slip PDFs
PDF Folder - Enter the name of the output folder to which individual recipient PDFs were saved when using Separate PDF for Each Recipient
- Browse - Opens Windows File Explorer to browse for the output folder
- Open - Opens File Explorer to the specified folder, letting you review the existing PDFs
Email Message
Subject - Enter the subject of the email, for example: “Here is your 2025 tax slip” 2nd Attatchment - You can add a second attachment to the email, in addition to the tax slip itself, such as a cover letter or any other document you may wish to include with the email; this attachment will be attached to ALL emails
- Browse - Opens Windows File Explorer to browse for the attachment to include
- Clear - Clears the 2nd attachment field
Save Email - Saves the current email message
Revert Changes - Undoes the most recent edits to the email message
Step 4: Review Email

Email Slips - Review
Preview Emails - Lets you review the email as it would be displayed on the recipient’s system
Pre-send Check - Lets you confirm that the selected recipients have been properly setup to receive email
Step 5: Configure Email Sending
Email Provider
Google / Gmail
Select this option if you will use your Google / Gmail account to send the emails, this will initiate Google’s security protocols to confirm that you have the authorization to use this account; use the Login to Email button to being the security check

Email Slips - Configure Email Sending - Google / Gmail
Microsoft
Select this option if you will use your Microsoft account to send the emails, this will initiate Microsoft’s security protocols to confirm that you have the authorization to use this account; use the Login to Email button to being the security check

Email Slips - Configure Email Sending - Microsoft
SMTP
Select this option if you will use your corporate email account to send the emails

Email Slips - Configure Email Sending - SMTP
Use the Configure SMTP button to configure your SMTP settings, you may need to discuss the SMTP settings with your IT department
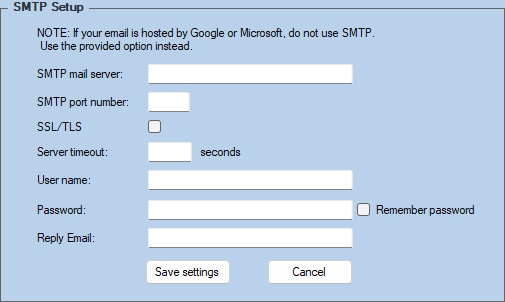
Email Slips - SMTP Settings
SMTP Mail Server - Enter the name of your SMTP server
SMTP Port Number - Enter the port number of your SMTP server; this will typically be one of:
- Port 25 - Standard SMTP port, minimal security
- Port 465 - Legacy port for secure email, requires SSL/TLS to be checked
- Port 587 - Default port for secure email, requires SSL/TLS to be checked
SSL/TLS - Check to enable secure email transmission when using either Port 465 or Port 587 (or any other port configured for email security by your IT department)
User Name - Enter the user name required by your SMTP server, this may not necessarily be your own email address
Password - Enter the password required by your SMTP server, this may not necessarily be your own email password
Reply Email - Enter the email address to which recipients can send replies, and which will also receive any non-delivery notifications; this can be any email address to which you have access
Email Send Rates
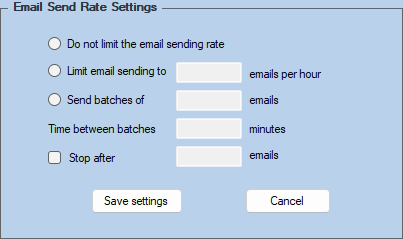
Email Slips - Sending Rates
Do not limit the email sending rate - Emails will be sent with no limitations, depending on the policies in place at your Internet provider; this may result in your email being flagged as spam
Limit email sending to ### emails per hour - Enter the number of emails to be sent each hour, once that number of emails have been sent, eForms will wait one hour before sending the next batch
Send batchs of ### emails - Enter the number of emails to include in a send batch; must be used in conjunction with Time Between Batchs
Time between batches ### minutes - Enter the number of minutes for eForsm to wait before sending the next send batch; must be used in conjunction with Send batchs of ### emails
Stop afetr ### emails - Enter the number of emails after which eForms will stop sending
Save settings - Saves the current send rate settings
Step 6: Send Email

Email Slips - Send Emails
Send a Test Email - Sends a test email to the email address of your choosing
Send Emails - Sends all emails and updates the sent status for each recpient