Backup & Restore a Data File
The Backup and Restore function allows you to make backups of your data file for archiving, security or as a precaution against a potential data loss.
Backup Data File
From the Home Screen use: 1. Data File (database) > More > Backup current data file
From the Menu use: File > Backup and Restore > Backup
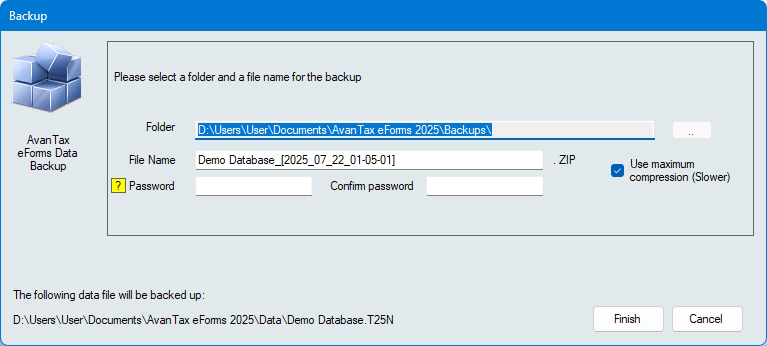
Folder - Enter the name of the folder where you wish to save the backup file. This folder can be on any storage media accessible to the computer running eForms including external and removable storage devices.
File Name - Enter the name you wish to use for the backup file. This name does not need to have any association with the name of your data file or company; it is simply a name that will allow you to quickly sort through backup files and pick the appropriate file to restore (see below). We recommend including the date in the file name so it will be easier to select a backup file from a specific point in time when performing a restore.
The combination of your selected folder and file name is displayed in the lower left corner of the backup dialogue.
Password & Confirm Password - You may optionally secure the backup file by creating a password. Enter the password, if desired, in the Password field and confirm the password in the Confirm Password field. Passwords can be a combination of any letter, number or symbol; to a maximum length of 30 characters. Passwords are case sensitive NOTE: Record your password and store it in a secure location as the backup file will no longer be accessible if the password has been lost and we will not be able to recover the password for you.
Use Maximum Compression - While all backup files are compressed, if this box is checked the backup file will be created with maximum compression. This will cause the backup(s) to take up less storage space. While this will slow down the backup and restore process somewhat, it is useful if you need to create the smallest backup file possible.
Once all the settings have been configured to your satisfaction you can click the “Finish” button to create your backup. If any users have the data file open at their workstation the backup will not be successful.
Restore Data File
From the Home Screen use: 1. Data File (database) > More > Restore data file
From the Menu use: File > Backup and Restore > Restore
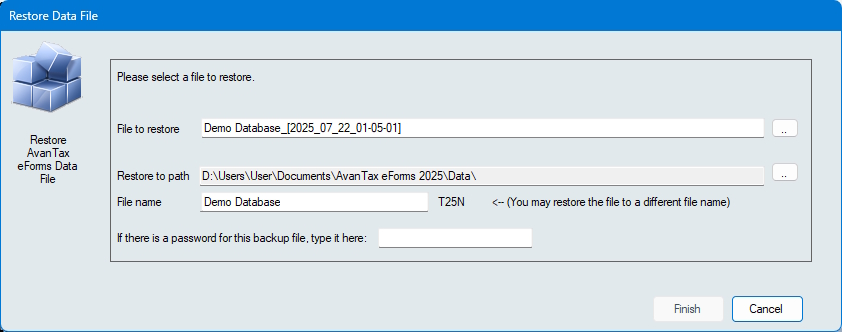
File to Restore - Enter the folder and filename you used when creating the backup (see above); or you can use the ellipsis at the end of the field to browse folders for the backup file to restore.
Restore to path - Enter the folder to which you will restore the backup. This can be either an existing folder containing eForms data files or a new folder created specifically for the restore. If you are restoring data to an existing folder please be aware that any data file in that folder with the same name as one contained in the backup file will be overwritten. If other users have the file open at their workstations the restore will fail.
If there is a password for this backup, type it here - Enter the password, if any, that was used to create the backup. Please note that passwords are case sensitive.
Once all the settings have been configured to your satisfaction you can click the “Finish” button to restore your data file. Once the data file has been restored you can open it as you would any other eForms data file.