Entering & Editing Slip Data
QuickHelps Video - Edit Slip & Summary Forms
From the Home Screen use: 3. Forms and Data > View and edit forms
From the Menu use: Forms > Forms Centre
Refer to The Forms Centre for details on selecting the return type and form to edit.
Slip Data Entry Screen
An example of the T4 slip data entry screen is displayed below.
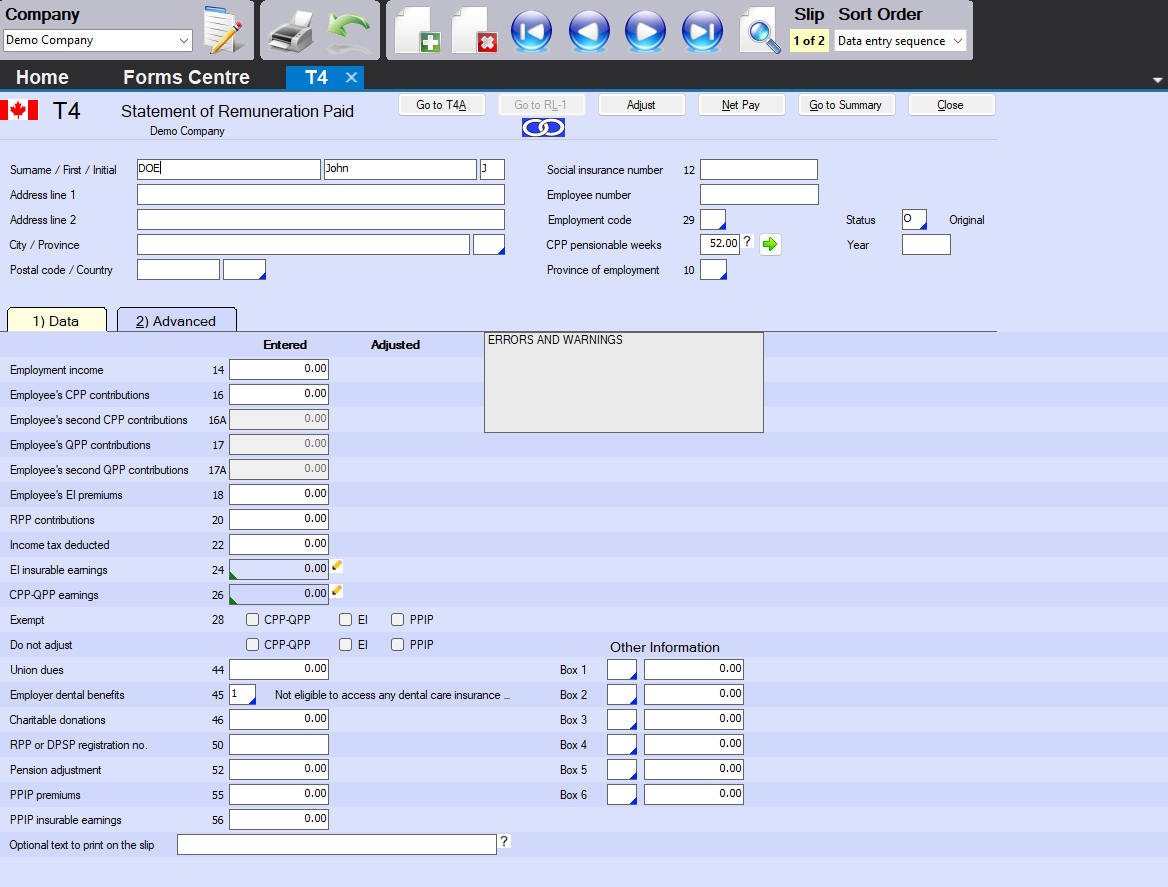
T4 Slip Data Entry Screen
To enter data into a data entry screen, simply select a field and type the data into it, then hit either TAB or ENTER to move the cursor to the next field. Once a slip contains data, a new slip can be added by one of the following methods:
- click on the Add Slip icon in the icon toolbar

- select Add Slip from the Edit menu
- press Ctrl + A
- press PgDn
At any time during data entry, you can:
- manipulate data by using the key combinations described here
- find, print or sort slips by using the toolbar icons described here
Buttons
Go to form name - Some forms, like the T4, may have associated forms, such as the Relevé 1, clicking on the approprite button will open the data entry screen for that form
Adjust - eForms can globally calculate CPP/QPP, EI & PPIP discrepencies for T4 and the Relevé 1 forms, clicking this button will calculate such discrepencies for only the current form
Net Pay - Click this button to display or set the Net Pay settings for the current company, as described here
Go to Summary - Opens the summary for the current return
Close - Closes the current data entry screena is saved to the data file before closing.
Fields
Surname / First name / Initial - Enter the recipient’s surname, first name and initial in the appropriate field; some forms, such as the T5 and the RL3, will display different recipient name entry fields depending upon whether the for is for joint individuals, a corporation, partnership or otherwise;
Address line 1 - Enter the first line of the recipient’s address
Address line 2 - Enter the second line of the recipient’s address
City / Province - Enter the city and province of the recipient’s address; valid province names can be selected from the list displayed by double clicking on the province field
Postal code / Country - Enter the postal code (or ZIP code) and country of the recipient’s address; the postal code field allows 10 characters and accepts Canadian postal codes and US ZIP codes; the country field is limited to 3 characters, valid country names can be selected from the list displayed by double clicking on the country field
Tax Year - Enter the taxation year to which the slip applies, tyipcally 2025
Social Insurance Number - Enter the recipient’s SIN. Due to electronic filing requirements, the SIN field the postal code field allows 17 characters and can accept a SIN or Business Number (BN) as required by the form; eForms will validate the SIN and display a message if the SIN is invalid
Status / Relevé Code - Enter the appropriate code to designate whether the slip is an original, cancelled or amended slip
Errors and Warnings - Messages regarding incomplete or missing data will be displayed in this area
Optional Text to Print on the Slip - Information entered here, to a maximum of 15 characters, will be printed at the top of the slip; this is for internal information you may wish to record on the slip and is not reported to CRA or Revenu Québec
T4 & Relevé 1 Fields
The T4 & Relevé 1 forms share several fields unique to their use to report employment income:
CPP Pensionable Weeks - Enter the number of CPP/QPP pensionable weeks worked by the recipient (the default is the value entered as Maximum Number of Pensionable Weeks) and is used to accurately calculate CPP/QPP deducted for the recipient if you Adjust based on number of pensionable weeks
Province of Employment - Enter the province in which the recipient was employeed, which may not necessarily be the same province as reported in the address; enter “QC” to create a Relevé 1 form for the current recipient
Exempt boxes - Check any combination of the CPP/QPP, EI and PPIP/QPIP Exempt boxes as appropriate for the current employee
- Do not check the CPP/QPP exempt box if you entered an amount for CPP or QPP; check CPP/QPP exempt only if the earnings were exempt or ineligible for the entire period of employment
- Do not check the EI Exempt box if you entered an amount for EI; check EI exempt only if the earnings were exempt or ineligible for the entire reporting period of employment
- Do not check the PPIP/QPIP Exempt box if you entered an amount for PPIP or QPIP; check PPIP/QPIP exempt only if the earnings were exempt or ineligible for the entire reporting period of employment
Do Not Adjust boxes - Check any combination of these boxes to ignore this slip when the slips for this company are adjusted; this allows you to adjust some slips while leaving other slips as entered; this will impact the display of slip totals on the summary
Advanced Tab
Click on the Advanced Tab of the data entry screen for any slip to display aditional information used by advanced features in eForms; items indicated by an asterisk are available in eForms Enterprise only.
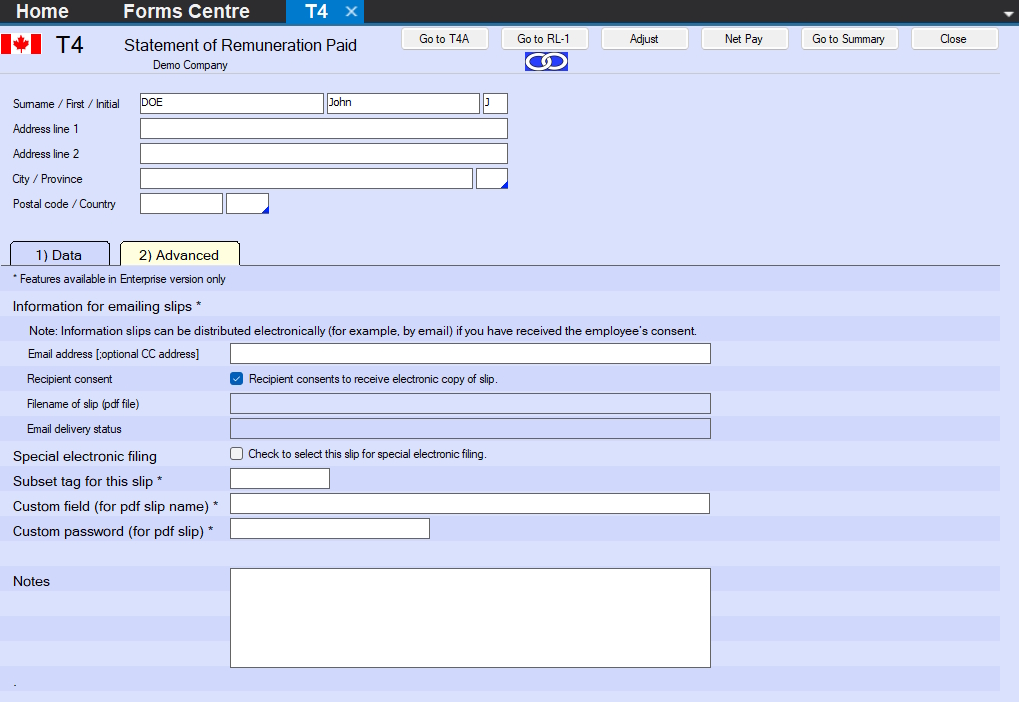
T4 Data Entry Screen
Email address [optional CC addres] (eForms Enterprise only) - Enter the email address that will be used to email a PDF copy of the recipient’s slip. You can add a second email address by separating it with a semi-colon from the first email address: firstrecipient@domain.com;secondrecipient@domain.com.
- The Recipient consent checkbox MUST be selected to indicate that the recipient has approved the use of their email address in this way. Per Canadian privacy legislation, you are required to obtain the employee’s consent before distributing slips in electronic format.
Filename of slip (PDF file) (eForms Enterprise only) - This is the name of file which will be emailed to the recipient.
Email delivery status (eForms Enterprise only) - The delivery status field indicates whether or not the slip has been emailed to the recipient
Special electronic filing - Used by all versions of eForms to include only a subset of the total dataset in an XML submission, refer to Submit a Data Subset for more information
- Check the box to select the current slip to be included in an XML submission containing only selected slips
- This box will be cleared for each slip after the XML file has been created
- You must also check the box marked “Only process slips that are selected on the Advanced tab” in Step 4 of creating an XML file
Subset tag for this slip (eForms Enterprise only) - The subset tag field is used to distinguish one batch of slips from another for internal purposes, slips can then be printed and filed in these subset batches; for example, you can use the subset tag “May” to distinguish a batch of T5s entered in May from T5s entered in June with the subset tag “June”
Custom field (for PDF slip name) (eForms Enterprise only) - Used when creating Separate PDF Slips to specify a unique file name for the recipient’s PDF slip
Custom password (for PDF slip) (eForms Enterprise only) - Used when creating Separate PDF Slips to assign a unique password to the recipient’s PDF slip
Notes - The Notes field can be used to hold any information not included on the recipient slips or in data submitted to CRA & Revenu Québec; these will not appear on any report generated by eForms.