Import from Excel (XLSX / CSV)
Import is available in AvanTax eForms Standard and AvanTax eForms Enterprise only
QuickHelps Video - Edit Slip & Summary Forms
Before You Begin
CSV
From the Home Screen use: 3. Forms and Data > Import and export data > Import from CSV
From the Menu use: Tools > Import / Export Data > Import from CSV
XLSX
From the Home Screen use: 3. Forms and Data > Import and export data > Import from Excel
From the Menu use: Tools > Import / Export Data > Import from Excel
Both eForms Standard and eForms Enterprise allow data in CSV or XLSX format to be imported from any third party data sources. The process of importing from CSV is very similar to importing from Exel (XLSX), the primary difference being that the CSV file is a text file which can contain a single import table. When importing from CSV, save the file as an MS-DOS CSV file to ensure compatibility with Windows based computers.
An Excel import file is intalled with eForms, and can also be downloaded from our website. This file containing a template for each form supported by eForms, with a special worksheet, named Sample Data (T4A), showing an example of a sample T4A import template.
NOTE: You are not required to use the supplied import template, and are free to use your own import file, if you wish, but the file you are importing from MUST meet the formatting specifications in our import tables.
Importing Slip Data
An example of the Excel import dialog for slip data is shown below.
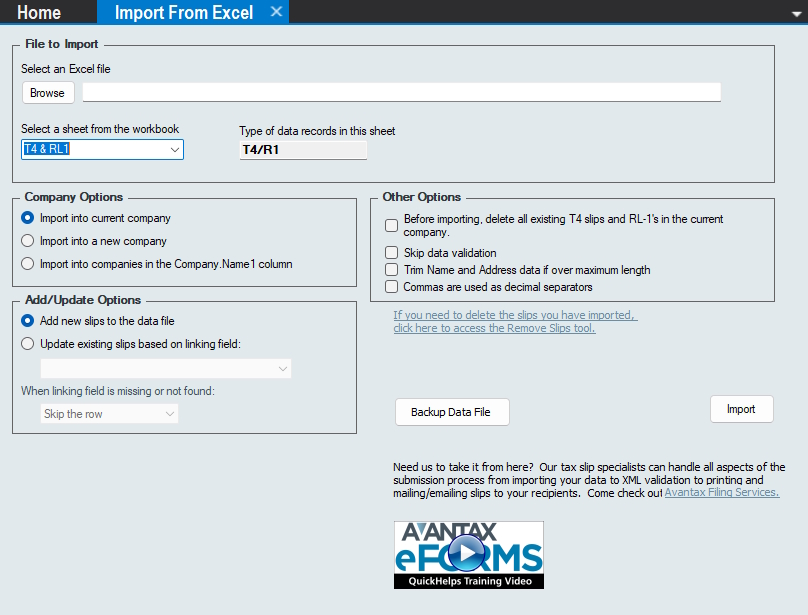
Import Silp Data from Excel (XLSX)
Select an Excel file - Enter the location and name of your import file
Select a sheet from the workbook - This drop-down will display all sheets in the selected Exel file, select the sheet containing the slip data to be imported
Type of data records in this sheet - Displays the type of data to be imported (eg: T4, T5018, Relevé 5 …)
Company options
Import into Current Company - Imports data from the import file into the currently active company, the name of which is displayed in the upper left corner of the eForms window
Import into New Company - Imports data from the import file into a new company, you will be prompted to enter a name for this company before the import begins
Import into companies in the Company.Name1 column - Imports data from the import file into the companies indicated in the “Company.Name1” column in the iport file; the company will be created if it does not alread exist in the data file (such as if it is a new company or if the name in Company.Name1 cannot be found in the data file)
Add/Update Options
Add new slips to the data file - Each slip in the import file will be imported into the data file as a new slip; if the slip already exists in eForms, it will be duplicated
Update existing slips based on liking field (eForms Enterprise only) - This option uses the enhanced import features of eForms Enterprise to update existing data by means of a linking field. The linking field can be any field that is unique to each recipient (such as the recipient’s SIN). During the import, existing data for the recipients already in the data file will be updated with the data in the import file if a matching linking field is found
When linking field is missing or not found - Use this option if no existing recipient is found with a matching linking field to either: a) Stop importing; or: b) Continue importing, skipping the record for which no linking field was found
Other Options
Before importgin, delete all existing ?? slips in the current company (where ?? indicates the slip type) - Deletes all slips already in the data file that are the same as the slip type being imported. NOTE: This option is irreversible. You will not be able to recover data after it has been deleted unless you backup your data file before importing data
Skip data validation - By default, eForms will scan the import file for data format errors prior to importing, use this option if you wish to skip validation and import data as it stands; not validating data at this point may result in validation errors when processing the XML submission for this data
Trim Name and Address data if over maxiimum length - This option will truncate name and address information which exceeds the maximum data length specified by CRA and Revenu Québec
Commas are used as decimal separators - On importing, eForms will interpret numerical data according to the regional settings on your system, this option will force eForms to import numerical data with commas as decimal separators on the rare occasions where your system’s regional settings do not allow this to take place
What happens - Unless you are using the enhanced import features of eForms Enterprise to merge imported data with existing data, eForms will add the imported slip data to the desired company. If there are already slips of this type in the company, the imported data will be appended to the existing slips. For example, if the target company had 10 T4 slips to begin with, and 15 more T4 slips were imported, the company will now have 25 T4 slips.
Importing Company Data
An example of the Excel import dialog for company data is shown below.
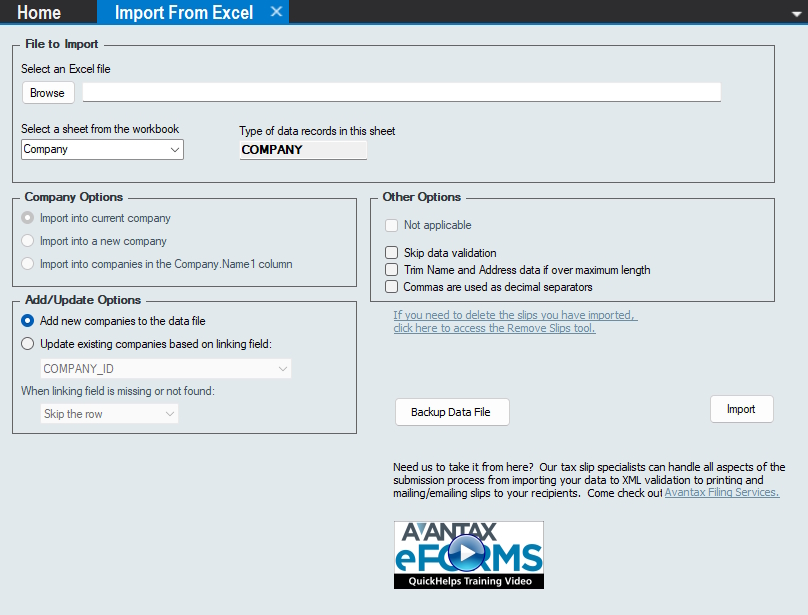
Import Company Data from Excel (XLSX)
Select an Excel file - Enter the location and name of your import file
Select a sheet from the workbook - This drop-down will display all sheets in the selected Exel file, select the sheet containing the company data to be imported
Type of data records in this sheet - Displays the type of data to be imported (eg: T4, T5018, Relevé 5 …)
Company options
These options do not apply to importing company data and are disabled
Add/Update Options
Add new companies to the data file - Each company in the import file will be imported into the data file; if the company already exists in the data file, it will be overwritten
Update existing companies based on liking field (eForms Enterprise only) - This option uses the enhanced import features of eForms Enterprise to update existing data by means of a linking field. The linking field can be any field that is unique to each company (such as the Business Number). During the import, companies already in the data file will be updated with the data in the import file if a matching linking field is found
When linking field is missing or not found - Use this option if no existing company is found with a matching linking field to either: a) Stop importing; or: b) Continue importing, skipping the record for which no linking field was found
Other Options
Skip data validation - By default, eForms will scan the import file for data format errors prior to importing, use this option if you wish to skip validation and import data as it stands; not validating data at this point may result in validation errors when processing the XML submission for this data
Trim Name and Address data if over maxiimum length - This option will truncate name and address information which exceeds the maximum data length specified by CRA and Revenu Québec
Commas are used as decimal separators - On importing, eForms will interpret numerical data according to the regional settings on your system, this option will force eForms to import numerical data with commas as decimal separators on the rare occasions where your system’s regional settings do not allow this to take place